Posted on

Pork & Greens Tteok-bokki  

I love food from all different nations and backgrounds. I believe the best way to learn about a culture is through their food!!!! Yummmy!!!!🤤🤤🤤
I absolutely love rice noodles, but a few months ago I discovered Tteok-bokki or Korean rice cakes or sticks. These are lovely thick chewy noodles made from rice and formed in different shapes, typically long cylinders. One can typically find them in Asian food markets for fairly cheap. This bag ran me under $5 here in Portland Oregon area.


On to my tasty tteok-bokki dish.

Boil your desired amount of rice sticks until soft. Drain and set aside. You can stir a teaspoon of oil so they don’t stick.

For this dish I used hog jowls that I cut into chunks. However, if you can not find hog Jowls, you can use thick bacon as well.


Cook meat until cooked thoroughly, then remove to a paper towel.


Pour all fat left in pan from meat in a coffee mug and set aside except for about 3 tablespoons.

Dice 1 large onion (white or yellow) and add to pan and let cook for about. 3 minutes in high heat.


Add in 1 package of sliced mushrooms (crimini or white)


1 teaspoon oh diced garlic and 1/2 teaspoon minced ginger.


Add a little salt, Cook together another 4 minutes.

Add a handful of baby Arugula to pan and stir 30 seconds.

Add in the tteok-bokki or rice sticks and turn off heat.


Now I purposely did not make a sauce for this dish because I wanted to try this Frank’s RedHot Stingin’ Honey Garlic Hot sauce. But you can make any sauce; use soy sauce, hoisin, etc.


I added my Honey Garlic Hot sauce on top of my dish and sat down and enjoyed the chew.


Now when and if you reheat this, you must do so throughly because the rice cake need a little extra heat to soften up. So 2 minutes in the microwave might do or you can just reheat on the stove with a little water.


Until next time; Cook, Eat and Enjoy!!!!

Posted on

Apple Butter Granola

Happy 2017 Foodies. It has been a while. I hope 2016 ended good and 2017 has been just as good thus far. I have been… living life; still cooking and eating, but just not cooking as much as I use to. However I will do my best this year to get as many new post out as life will possibly allow.
So, been dealing with all sort of health issues which has caused me to start to change my diet. I am trying a more gluten free and vegan approach to life, however, please believe I still eat my meat, just not as often.
Surprisingly, it is not really that difficult to substitute a few meals a day with completely vegan options, especially since I like veggies. The difficult part is that I have to monitor what types of veggies I eat and how much. But life is all about balance and I am constantly trying to find mine. On to this yummy granola.
I did my best to make sure all the ingredients I used were gluten free, and surprisingly, this only took 5 ingredients to make:
1 (2 pound bag) old fashioned rolled oats (gluten free)
2 cups oat bran (gluten free)

16 oz of Apple butter

3 tablespoons Ground Cinnamon

3 tablespoons coconut oil


First heat your oven to about 400 degree Farenhieght. Line a cookie sheet with foil and set aside.

Now in a sauce pan, add the 3 tablespoons of coconut oil and the entire jar of apple butter and let melt together on medium, to medium high heat.


Next, Add oat meal, oat bran and cinnamon to a large mixing bowl, and mix together. I used a wooden spoon, doesn’t stick as bad.


Once the Apple butter and coconut oil has melted together and you have mixed, added to the oats and begin to mix with spoon. It may look like there is not enough apple butter or to much oats, but continue to mix and everything will coat.


After you have coated to your heart’s desire, spread a layer of the mixture onto the cookie sheet. If you have more than one cookie sheet, go ahead and use them. For me, I baked about 3 batches.


Once in the oven, bake for about 10 minutes at a time until it is the desire brown and crunchiness you want, taking a spoon an mixing it around each 10 minutes.

Let each batch cool on counter before storing in an air tight container.

My daughters and I love this as a topping on our yogurt, or as cereal. With the oat bran, it adds extra protein to this granola which helps add energy to any snack.


This is such a quick and easy granola and I absolutely love making it and all version of it. 

Until next time, continue to Cook, Eat and Enjoy!!

Posted on

Easy Bean Salad 

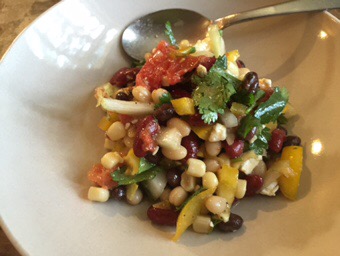
So today is Memorial Day and I decided to cook in instead of cookout. And a bean salad was on my mind. So for the vegetarians out there, this is perfect.

 Here is what I used:


Low sodium canned white, black and kidney beans. A can of white sweet corn, can of diced tomatoes. 1 yellow bell pepper, a half sweet onion, 1 bunch of cilantro. Jalapeño feta cheese, extra virgin olive oil, lemon juice, mustard, honey, and apple cider vinegar, salt and pepper.

Okay here we go:

Open all beans and corn and put them in a strainer, drain all liquid and rinse with cold water let sit


Dice small a half an inion and the yellow bell pepper 


In a large bowl add onion, bell pepper, beans and corn and can tomatoes. Mix together.


Now time for the dressing:

In a bowl added 1/4 cup of extra virgin olive oil, 2 tsp lemon, 2 tbsp yellow mustard, 3 tsp apple cider vinegar and 2 or 3 tsp of honey.


Sprinkle with pepper then whisk until smooth


Pour over beans, then rough chop and added cilantro and feta cheese


Mix everything together. Add salt and pepper to taste. You can serve cold or warm. 


Until next time, cook, eat and enjoy!!!

Posted on

Couscous with Veggie Medley

I have been trying to make my life easier as I continue on my high protein diet by making some of my sides ahead of time and adding everything together.

This time I wanted to experiment with couscous because I have never had it before and I love trying new things. To make couscous you follow the directions on your package, or if you get it in the bulk-food department like me, here is how I made it.

I used multi-colored couscous


1 and 1/2 cups of couscous in a pot with a bit of salt and add water until it just covers the couscous.

  
Cover, Bring to a boil and then lower heat and let simmer on low heat until water has soaked in completely. Remover from heat, mix from the bottom, replace top and let the heat steam.

  
Now time for the Veggies. 1 Can of Garbanzo beans rinsed, 1 tomato, diced. My favorite garlic pop-ins and grilled onions.

 Speaking of new things, have you ever heard of Kale Sprouts? I went to Trader Joes and found it here. I love Trader Joes, I always find something new there that I haven’t seen or heard of.
Anyway, Kale Sprouts are a mix between, you guessed it, Kale and Brussel Sprouts and have a similar flavor.

Rinse and cut the ends off.

  
I happen to have made some bacon the morning of, so I used the oil from that, but any oil is okay.

 Heat oil then add Kale Sprouts, tomatoes, 4 pop-in onions and 4 pop-in garlic saute for about 4 minutes.

 Diced 1 roasted red bell pepper.

  
Add in the Garbanzo beans, bell pepper, salt to taste and I like a little heat, so I added about 1/2 teaspoon of crushed red pepper.

  
Let all that cook together until the Kale Sprout are cooked to your liking.

Last step is add in the Couscous, mix and place top over pan for about 5 minutes off heat.

     This is the perfect side dish or you can eat it as a main meal. All the protein , fiber, vitamins and such, in one meal, that is actual really light.


 Until next time, cook, eat and enjoy

Posted on

Nothing Fancy: Pan cooked Trout 

People tell me all the time that they are afraid to pan cook items. Afraid that they will burn or not cook their item enough, etc. One of those items is fish fillet.

Everything doesn’t have to be fancy or complicated; a lot of times, simple is best.

So I am gonna show you how to pan cook a trout fillet with yhe skin on. I love skin on my fish, especially when the skin is crispy.

So. I have two store bought trout fillet with skin on. I seasoned both sides with seasoning salt, black pepper and garlic powder.


In a frying pan, big enough to fit both fillet and have some room, add about 3 to 4 tablespoons of olive oil and heat. You want you pan hot, but not smoking.

  
Now add your fish, skin side down. When you put it in, it should be sizzling. You want  your skin to be crispy.

  
You are only gonna flip your fish once so the skin will stay crispy. When you see the edges of the fish turn white, it is a good bet that it is time to flip.

 
So flip your fish


You can see the pretty caramelization on the skin. Now you have to give the other side time to cook, abot 3 to 5 minutes.


 I did a quick check and the meat side is starting to brown, but it is not quite cooked through, so add  about 1/4 cup water to the hot pan

  
The water to the hot pan and oil will create steam and take the fish over the finish line of done in the middle. 

  
The water will cook up and create a nice little fish broth as well that, in my case I added over some steamed broccoli I had leftover from the night before.

  
And there you have, nothing fancy but extremely tasty pan cooked trout with crispy skin.

Until next time, cook eat and enjoy!


Posted on

Keep it Simple: Chicken Veggie Stir-fry 

It has been a while. The last year has been extremely difficult, but I am back and ready to keep moving forward. Over the next few weeks, there will be some changes and annoucement, but for now let’s get started.

It seems like now a day, there just doesn’t seem to be time to fit in the necessity let alone the things we desire. So often times we turn to takeout instead of making a meal, although it is not always a healthy choice. Well here is a a quick a healthy option that will take less than 15 minutes. Remember everything doesn’t have to be complicated.

Chicken Veggie Stir-fry 

Here is what you need.

1 large frying pan Or wok

3 tablespoons olive oil

16 oz cooked chicken

2- 16 oz frozen bag stir- fry veggie

2 garlic cubes (optional)

2- onion cubes (optional)

2- ginger cubes (optional)

Soy sauce


Add 3 tablespoons of olive oil to a frying pan and heat on med high to high heat. Make sure your oul is hot but not  smoking before you add the veggies.

Add both bags of veggies. (There are several different kinds of frozen stir-fry, pick what you like) I love these herb cubes, that can be found in the frozen vegetable section; they are so convenient. Pop two of each in. Cook 4 minutes. Place top over to increase cooking speed. 

  
After about 4 or so minutes, the veggies should be well on the way to being unthawed, Push veggies to the side and add chicken, then mix everything together and cook until veggies are done and the chicken is heated completely.


Add soy sauce for seasoning. Because of the high sodium, no salt is required 


If you like things a little spicy like me, add a little crushed red pepper

And there you haveit, a quick and healthy meal that you can make in less than 15 minutes at home. Have your kids help, which can be fun and definitely a learning experience for them and you.

Until next time, cook, eat and enjoy!


Posted on

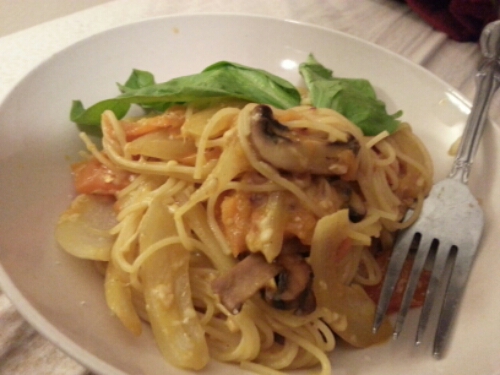
Quick Angel Hair Pasta with Veggies

Hey Winners, this meal takes a quick 10 minutes. In the time it takes to boil a handful of angel hair pasta, the rest will be done. So quickly:

Boil a handful of angel hair pasta.
-in a pan with olive oil about 6 crimini mushrooms sliced, 1 small onion sliced, sauté.  Then slice an heirloom tomato add to the pan, with a teaspoon of diced garlic.

-Cook for about 3 minutes sprinkle with a little salt. Add crush red pepper if you like it spicy.

-Deglaze with red wine vinegar
– add pasta and finish with parmesan.

No meat required or needed.
Until next time: Cook, Eat and Enjoy and take it one day at a time. Stay encouraged.
image

image

Posted on

Apple and Onion baked Chicken

I have been asked to help a group that is on a weight loss journey and needed help with meal planning. I am more than happy to help because even as a personal chef, I struggle personally with my weight and strive every day to keep it in check. So I know the hardship, thus here is your first meal idea.

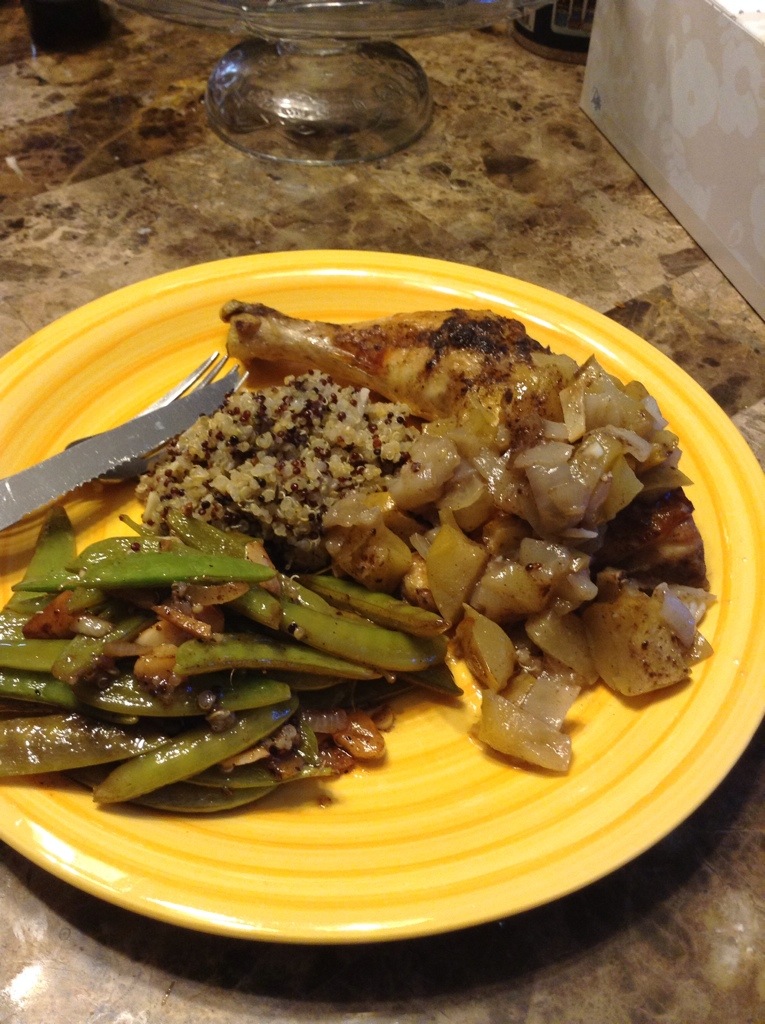
Apple and onion baked chicken with herbed tricolor quinoa and sautéed sugar snap peas.

I choose to bake this chicken instead of cooking it nor the stove, because a lot of people are not comfortable with stove top cooking meat, this way you prep it, stick it in the oven and let it do its thing.

So here is what you will need for the chicken.

-your preferred cut of chicken, mine is a quarter
– a small onion, diced
-the apple of your choice, mine is a golden delicious, diced
-seasoning salt and black pepper
-3 cloves of garlic diced roughly
-allspice
-olive oil
– cup of water

20140716-162459-59099710.jpg

For the Quinoa you can use regular or tri-color, you need, kosher salt, dried parsley, dried basil, dried diced onions, and touch chopped garlic

20140716-162545-59145868.jpg

For the sugar snap peas, just a handful of them, roughly chopped garlic, olive oil, and a little kosher salt.

The first thing you want to do is put your quinoa on because it will take about as long as your chicken. The package says 1 cup of quinoa and 2 cups of water; let it come to a rolling boil then lower the temp and let it simmer until done. Here are a few tips to cooking an making quinoa taste great.

Follow the instruction above, but before you boil it, add the garlic, 1/2 teaspoon (tsp) of kosher salt, basil, parsley and onion and a teaspoon of olive oil.

20140716-163448-59688894.jpg

Let boil then simmer until water is consumed, with the top on.

20140716-163544-59744656.jpg

20140716-163546-59746568.jpg

Then add another 2 cups of water and let it do the same and you should end up with quinoa that looks like spirals are coming from them.

20140716-164032-60032517.jpg

Now that you have that started, in a pan place your chicken and rub both sides with a little olive oil.

20140716-164136-60096330.jpg

FYI: Seasoning is not a bad thing if you use it while you are cooking. The issue happens when you start adding salt when the food is on your plate. Season both side of the chicken with a little seasoning salt and black pepper.

20140716-164718-60438281.jpg

Dice your apple with skin on and your onion and your garlic and add it to the pan with the chicken along with two cups of water. And sprinkle allspice on top of everything, then bake in a 380-degree oven for about 45 minutes or so. (Each oven is different)

20140716-165031-60631901.jpg

20140716-165030-60630862.jpg

20140716-165033-60633214.jpg

20140716-165035-60635073.jpg

When it is finished mix the apple in the pan and let it rest for about 5 minutes.

20140716-165128-60688471.jpg

While the chicken is resting, it is time to make the peas which take about 3 minutes.

In a pan add 3 tsp of olive oil and heat.

20140716-165258-60778864.jpg

Add the garlic and peas and a dash of kosher salt and black pepper and let it sauté until the garlic starts to brown

20140716-170200-61320207.jpg

20140716-170202-61322447.jpg

20140716-170201-61321362.jpg

Add a little red wine vinegar to the pan to give you peas a little bite. Cook for another 30 seconds then remove from heat

20140716-170316-61396962.jpg

20140716-170318-61398390.jpg

And now everything is done, plate your food and remember your portions. A portion is about the size of your fist. Although an extra helping of veggies instead of a starch is always welcome.

Until next time, Cook, Eat and Enjoy!

20140716-170728-61648796.jpg

20140716-170727-61647403.jpg

Posted on

Healthier Ramen

Hi, my Cooks, foodies and general food lovers. First, let me start with a late Happy New Year. Here is to a prosperous New Year for you all.

Now for those who haven’t been watching the news, it is snowing here in the Portland, Oregon metro area. When I say snow, I mean a lot of snow for us. It has been snowing for 3 days now. Here are pics of my driveway yesterday.

image

image

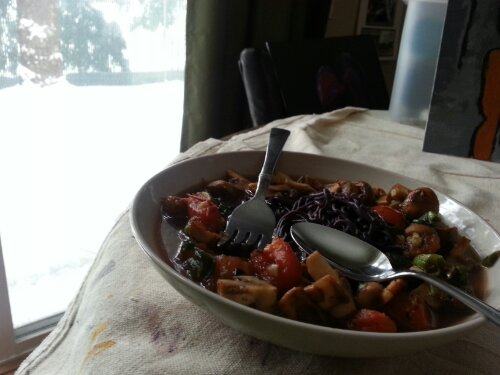
It is like a winter wonderland. Now to the food. Because it is snowy and cold, this would be a day for soup, but that is a little time-consuming. Therefore, I opted for ramen. The downside about ramen is that it has a high sodium content from the seasoning pack. Well, I found this Lotus Food rice ramen at Whole Foods grocery store that has half the sodium in the miso seasoning pack; if you want to cut that again, either leave the seasoning packed out completely or use half.

For this particular dish, I used the Forbidden Rice Ramen, which is purple. If you ever had forbidden rice before, then you are gonna like this, if you haven’t, the flavor of the ramen is not strong so I think you newbies will like it too. In addition to the ramen, 1 diced Roma tomato, 2 stalks of green onion chopped and about 8 crimini mushrooms quartered.

image

Cook the ramen as directed

image

In a small frying pan added a little grapeseed or olive oil to the pan and sauté the green onion, mushroom, and tomato.

image

If you like garlic, dice 2 cloves and add to the veggie

image

image

Season with a little kosher salt and black pepper, then sauté until tender.

Either add half or the whole seasoning pack to a bowl and I like to add a little spice so I added some Sriracha Hot Chili Sauce to mine.

image

Add the noodles to the top.

image

Then add the veggies around the edge.

image

Add the liquid.

image

And there you have it.

image

image

Mix and there you have a Quick and healthy Ramen on a cold snowy day.

Until next time: Cook, Eat and Enjoy!

image

Posted on

Happy Thanksgiving!

Well hello to all my food lovers, it has been awhile. Yes I am still around, but I had to focus on finishing school which I did. I graduated in September Magna Cum Laude in the Service Management Bachelors Program at Ashford University (YEPPIE). Now to find gainful employment…

But of course I have been cooking and photographing some of my exploits, so in the coming weeks I will be sharing those.

I hope everyone had a wonderful Thanksgiving; my family and I just finished eating and I am in desperate need of a well deserved nap. But before that,  I just wanted to touch base with my followers and let you know that I am still here and cooking.

So quickly, This Thanksgiving,  I kept it traditional: giblet stuffing and gravy, turkey, macaroni and cheese, candied sweet potatoes, greens, and a extremely small serving of chitterlings. I bought my pies this year, apple and sweet potato and I made a small chocolate cake for the hubby. I did most of my cooking yesterday, but made my mac and cheese, sweet potatoes and turkey today. If you have questions on how I prepared something in one of the pictures, leave it in the comments. I am full and now I must nap. Until next time, Cook, Eat and Enjoy!

image

image

image

image

image